Thursday, January 26, 2017

Female Assassin

Assassins take no pride in fighting fairly. We take pride in winning.

A single piece for this week's Challenge; a female assassin from Dark Swords Miniatures. The figure is not attached to any planned games or project, really, it's a Christmas gift from the girlfriend. Now usually when she gives me figures as gift they go into the lead pile, and she gets to see them painted many moons later, so this year I decided to do something different and put it in my priority pile!

So there she is, I painted her as a single so I did spend more time on her than most other figures, and I'm really happy I did as I think she looks gorgeous! The figure itself is n awesome sculpt and has that nice Old School vibe the fantasy masters at Dark Sword still manage to produce. It's a very simple sculpt, no skulls or extra belts and stuff, but it is very effective.


Yes, I couldn't resist using some pink on the female warrior, cliché you might say, but I just love the colour and any excuse to use it is good with me! I tried to offset the bright colour with a darker mauve cloak, a very simple basing and some grey pants. I quite like the final results.


Now, of course, being who I am it might just be the start of a Frostgrave or Songs of Blades and Heroes warband! Somewhere the evil masters at Dark Swords are smiling, knowing I need at least 10 more of their figures...

(and a small but satisfying 5 pts for the Challenge)

Friday, January 20, 2017

Halflings Part II (LeafGrave project)

More StoneHaven Halflings this week, as I'm keeping up with my goals of painting 5 per week. The little buggers are a ton of fun to paint, and since each one is very different it keeps me from being bored of painting the same thing.

And so this week we have a gardener, a lorekeeper, a ranger, a ratcatcher and a skelly.


From left to right : Ranger, Gardener, Ratcatcher, Skelly and Lorekeeper


I exceptionally went with a different base style for the skeleton as the nice and happy goblin green didn't seem to fit very well with him. That figure is very cool, and the smoking pipe is a nice touch. I love the funny details on many of them; if you look closely, the Lorekeeper, just like any good teacher, has elbow patches on his jacket!

Same as the previous Halflings,  I used green and brown when possible while still going all over the place in terms of colours, to keep their individuality.

25 more points for the challenge!

Thursday, January 19, 2017

Photographing Miniatures : Part II, setting up your camera

So last time we discussed how I got my perfect set-up. You can imagine my frustration when I took some pictures and still they were dark and out of focus. After reading a few tutorials and some trial and error, I came up with settings which work very well for me.

So, everything needed was inside my camera, with the essential help of a tri-pod. To follow this Tutorial you need a good digital camera (mine is a Canon IOS Rebel T3) that you can put in "manual setting" and one which lets you play with Aperture, Iso and Shutter speed (exposure).

First and most important advice : DO NOT put your camera on "Macro" or "Auto" mode. I did this for years. It doesn't work for miniatures photography. What you want to do is control the settings of your camera manually. (BTW I'm no expert, what you are about to read has been picked up from the web and many tutorials. It might containt mistakes on the technical terms! I try my best, but I'm a self made man ;-) ).

Aperture is ‘the opening in the lens.’

When you hit the shutter release button of your camera a hole opens up that allows your cameras image sensor to catch a glimpse of the scene you’re wanting to capture. The aperture that you set impacts the size of that hole. The larger the hole the more light that gets in – the smaller the hole the less light. Aperture is measured in ‘f-stops’. In our case, we want a  a smaller hole (high number) so that everything is in focus. I go with f22.


In very basic terms, ISO is the level of sensitivity of your camera to available light. The lower the ISO number, the less sensitive it is to the light, while a higher ISO number increases the sensitivity of your camera. The ISO setting changes the sensitivity of the sensor. A low number like 100 will be crisp but will require a lot of light to expose the picture correctly. An ISO of 3000 will not require that much light but will be very grainy. I often read 400 is a good number, but I went with 200 and the results were remarkably better.

Shutter speed, also known as “exposure time”, stands for the length of time a camera shutter is open to expose light into the camera sensor. If the shutter speed is fast, it can help to freeze action completely. If the shutter speed is slow, it can create an effect called “motion blur”, where moving objects appear blurred along the direction of the motion. In our case, you want to play with the exposure meter (-2..1..0..1..+2). This is where I had so much difficulty. I kept changing the shutter speed setting until the cursor was on 0, but that always gave me too dark of a picture. Took me a while to figure that one out! Now I over exposure on the exposure metre about two clicks to get a brighter picture and a whiter background (so +2 instead of 0).

However, the long shutter speed means that, if you are holding the camera the picture will be blurry because of all the camera shake. This is where the Tri-pod comes into play, because we are going to use a long timer; with a long shutter speed just pressing the button can move the camera. The timer eliminates that. I use a full 10 seconds timer. You might say it's annoyingly too long, but honestly with all of the settings described above I rarely take more than 2-3 pictures of any subject to find my perfect picture. So basically 20-30 seconds per good picture is something I can live with!

Officially, I'm still missing two things; a better background (I like blue gradiant, although my current white works just fine) which I ordered from a recent kickstarter, and something to work on my white balance. But I'm a little lazy at times, so I let my Mac's IPhoto deal with my white balance, usually by "lightening" the picture just a tad.

So here you go! In recap, ISO of 200, Aperture of F22, +2 on the exposure meter, 10 seconds timer and a good tripod. Works for me! Of course, you might have to do your own tests so that you find what works best with your camera, set-up, lighting available, etc. It was a pain to spend time figuring all that out but now I think it's worth it!

My camera sitting on the Tri-Pod, with the proper settings

I'm very, very happy I finally managed to get it right, it is really such a relief. After figuring everything out, I spent a couple days smiling, and annoying the girlfriend by answering every problems with a "don't care, figured out my miniature photography".

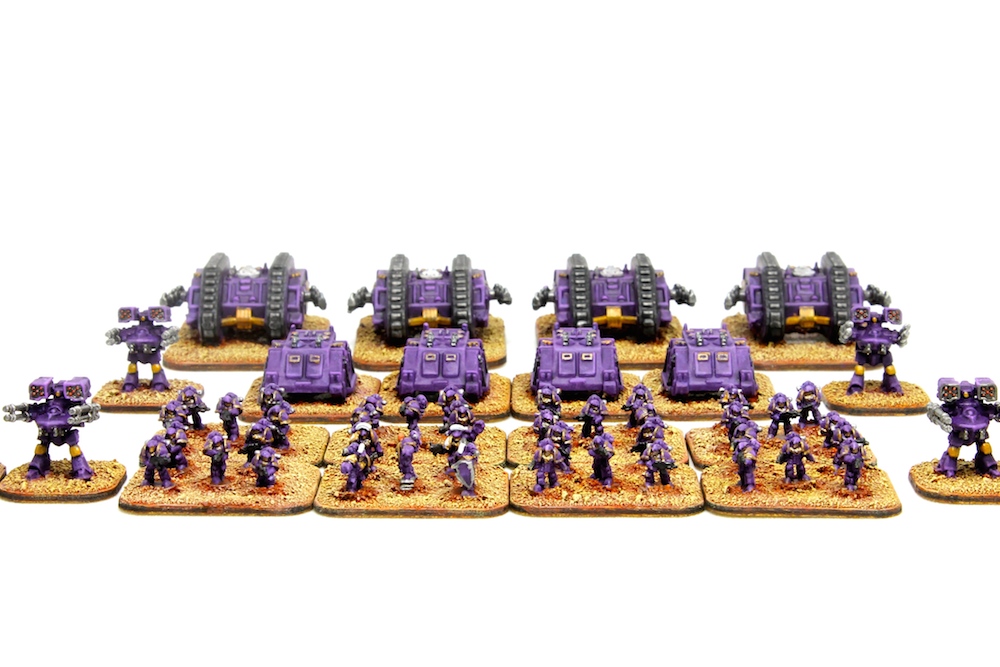
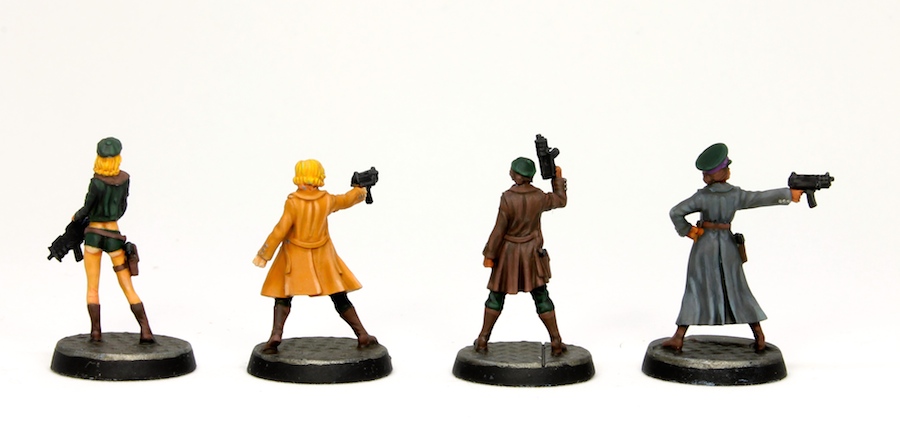
So now not only are all the settings good, but everything is set-up just the way I want; fast, quick and quality pictures at the roll of a chair! Some recent examples of photography from the new set-up :


Tuesday, January 17, 2017

Photographing miniatures, Part I; tools and set-up

Since I started blogging, my bane has always been Photographing miniatures. I hate it because it takes forever to set-up, and that means spare time not used to painting; I hate it because it always end costing money, from tri-pod to cameras to light-box, etc. (and again that means money not spent towards my hobby), and mostly I hate it because I'm not very good at it, and my pictures always end up too dark and I have to take 50 pictures to get two "good enough" picture. It has, in the past, played a role in irregular blogging posting habits. I would often wait until I had enough figures painted to spend an entire afternoon taking pics. But this way of doing thing really didn't work well with regular blog posts, and it's especially problematic during the Analogue Hobby Challenge, as I find it important to try to get a good rhythm and post every week or at least every two weeks.

So when I moved this Spring to a new house, I decided I needed to fix this issue once and for all, especially since I had the room needed; i'm indeed lucky enough to have an office (which also serves as my toys/comics collection room) upstairs to myself, as does Laurie. There were a number of things I wanted to adress, and it took me a long time to all put it together, mostly because I had to wait a few months because I was broke after the house move! So I wanted the following :
  • Permanent photography set-up. In the past I tried everything, from taking my pictures outside (not so good when summer is basically 3 months a year in Montréal), to setting up a table corner with terrain, to try to take pictures in front of a simple white paper sheet. All these would take time to install; bringing the terrain needed, getting the tri-pod, etc. I wanted something which would always be easily accessible, no set-up required.
  • A lightbox or something similar. I like to use my terrain for gaming, not taking pics, so I decided to go for a lightbox, with a permanent backgroup. Now, I like my house and my office to look nice, so not only did I wanted the box to be efficient and if possible cheap, I also wanted it to look smart in my office. So no home-made cheap looking cardboard box! 
  • A set-up right next to my computer; when taking pics outside or in the basement, you always have to go up and down the stairs to download your pics, and to double-check they are ok, etc. It's a lot of time wasted, and moreover not the best idea for my knees. 
So now lets look at the solution, which is fairly simple really. I already had a tri-pod (which I think is a must to take proper pics of minis) and a good camera. I needed a lightbox!

While perusing an Oldhammer blog, I found a review for the Foldio lightbox; it's a cheap lightbox, incredibly easy to assemble, small enough to fit on an office desk. And it was available through Amazon! And finally, it looks quite good and fits very well with the aesthetics of my Mac computer and office in general. I actually bought the Foldio 2, which is bigger and has more light than the Foldio 1, two problems mentioned by Matthew in his blog

However, lighting was still an issue, and indeed you don't have enough. I fixed this by buying two desk lamps and equipped them with daylight bulbs; faster and easier than buying more lights of the Foldio guys in Korea!

Here's a picture of the (permanent) set-up. 


To take pictures, I just roll my chair a bit to the left, get in front of the tri-pod, open all the lights and I'm done. 30 seconds and I'm in photography mode.


And then, to download the pics, I move the tri-pod with the camera still attached to it a few centimeters, and connect the USB cable straight from my usb multiple port adapter to the camera.


20 seconds later pics are uploaded, and I know if they are good. Yes, the whole point of this is to minimize as much as humanly possible all time devoted to photographing miniatures, while still getting great results. Toyota would call it "the lean method".

Of course, nothing is easy about Photographing miniatures, so I quickly realized that, while the set-up was great, my pictures still weren't...so stay tune for Part II!

Friday, January 13, 2017

Halflings, Part I (LeafGrave project)

As I mentionned in a previous post, I'm starting the work on a LeafGrave/Fantasy skirmish project ; the first Warband is a band of Halflings. I have around 40 of the little buggers from a StoneHaven Kickstarter, and I'd like to paint at least 20 of them for the Painting Challenge. The plan is to paint 5 of them per week, give or take a few weeks.

And it starts this week. As I mentioned, what I really love about the range is that each figures represents a RPG "class" or "profession", and every one of them is unique and full or personality. For this first batch of 5, we have the fighter, the chief, the cleric, the archer and the Rogue.

From left to right: fighter, cleric, chief, archer and rogue


The figures are lovely and super detailed, and have that Halfling caricatural look that I like. While painting them I realized one doesn't save that much time  when "batch painting" 5 completely different figures with different colour schemes! I wouldn't paint 10 at a time, that's for sure. 

I painted each one individually, but I did favour green and brown tones, which I find are traditional Halflings colours. I went with a super old school "goblin green" style of base to get a bit of that old 80s Citadel/AD&D vibe, but also because I didn't want to detract from the figures and wanted to keep a very woodland vibe to the whole bunch.

So 5 28mm (if a bit of the smaller side of the scale! ) figures equals 25pts to add to my challenge total!

Tuesday, January 10, 2017

Emperor's Children Armoured Division (30K, Epic style, Part III)

Children of the Emperor! Death to his foes! 


Well here it is, the first painted miniatures of my 30K Epic project; an Armoured Division (combined arms) of Emperor's Children. Of couse, I had to start with the forces of hope and change!

As mentionned in a previous post, the Emperor's Children, the IIIrd Legion, was always one of my favourite "traitor" legion. Mostly, I'll admit, because I find the purple & gold colour scheme looks really good on the battlefield, especially in the smaller scale. Their name, also, has always been a favourite of mine. Of course, I could also mention the Legion's "joie de vivre", so refreshing in this dark and grim world of the Emperor! Of course, the cheap propaganda of the Emperor has repeatedly referred to the Legion as made-up of hedonistic psychopaths! 


The Legion has a bit of a perfectionist complex and strives for perfection in all their endeavours and continuously works to perfect their military operations. Sustained not merely by the example of their peers but by a deep individual belief in their duty to their superiors and the Legion as a whole, they fought to the best of their abilities in all conditions, whether the battle was a massive attack or a simple patrol. Favouring a quick-strike and agressive approach to combat, I intend to give them more speed as the force grows.

I don't think I've ever worked that hard to get a colour right as I did with this purple. It's a good thing Rhino models are cheap because I tested at least five different recipes; every time I would paint a whole Rhino, to see how it looked finished with proper shading, metal work, etc. The purple was usually either too dark, too light or the shading and highlights were not visible enough. I wanted a purple which was bright but still a bit "evil" looking and not overly pink like the original EC colour scheme (I actually tried that at first but it was too much, even for a pink fan like me).
In the end, I went to my local GW stores and found my purple recipe! And I never use GW paints, other than  a few glaze and my trusted Leadbelcher. But finding the right colours and contrasts will make or break an Epic force. I then used the traditionnal white and gold secondary colours of the Emperor's Children to pick up details and add a touch of diversity to this field of Lilacs!

Painting technique was fairly simple (and all painted by hand, no airbrush here) : base coat, then a good wash of Army Painter wash, careful drybrush of highlight colour, and then a second edge highlight to pick up the details. Final details were then picked up with Brazen/gold and light grey/white.

I'm very happy with the results. 

So for this first painted Division, we have :

Space Marines clad in Mark III armours. The rules for Epic 30K requires rather big infantry formations, but it does look good. In the middle of the formation you can see a stand of sergeants with their white crest.


Rhino Armoured Personnel Carrier to transport the lads into combat. These are the classic, old school plastic Rhinos which came in the Space Marines box set of the late eighties. They aged remarkably well.


Land Raiders, famous and reliable heavy tank and transport vehicle. Also the original plastic models of my youth. The model has also aged remarkably well. The nostalgia feeling was high while painting these! 


Then a talon of Deredeo Dreadnoughts, my favourite dreadnoughts. They look really cool and remind me of some of the Robotech mech of my youth. I must say I gave these guys a bit of extra love and I think it paid off, as I really like how they came out! 


And finally, the big boys! Legion Fellblades, Super Heavy main battle tanks equipped with compact Mechanicum Atomantic Arc-reactor technology, a reinforced metaplas alloy chassis which provides protection superior to that of nearly all other Imperial armoured vehicles, and a (very visible) advanced Accelerator Cannon as its primary armament. Not to be fucked with. 

These are massive models measuring 45mm(!) in length and I spent a substantial amount of time working on them. I love their looks, and the additions of the legion symbols on the side doors makes for a welcome addition for someone like me who's freehand deficient!


And finally, the mandatory picture of 6mm figures next to a canadian penny! always wanted to do that! For you see, this force is my first time painting 6mm, in fact it's my first time painting another scale than 28mm! (Crazy, I know!) Bit of a leaning curve especially the first batch of infantry (I swore a little at first) but I got the hang of it pretty quickly and I really enjoy painting the little scale. I might be hooked. The girlfriend thinks I'm officially crazy for painting such tiny soldiers!


Points wise, for the challenge we have :

40 infantry x 0.5 : 20 pts
8 vehicles : 16 pts
2 Super Heavy : 8 pts
6 "guns" (dreadnoughts) : 6 pts

So a total of 50 pts to add to my total, and my first foray into the 30K duel! Huzzah!

This was entered as my submission in the Armour Bonus Theme Round . If you like it please go vote for me!! Rewards includes bragging rights, hobby goodies and extra points for the challenge. 

Friday, January 6, 2017

The Vordania II Insurrectio

Freedom looks beautiful and inspiring to those who desire & seek it; but Freedom looks like rebellion to those who have become complacent in hiding.

Antin Sanu, ex-commissar of the Imperium, leader of the Vordania II Insurection

Vordiana II is a small planet on the outskirt of the Majorian System. Like most planets of the system, it exists under the Imperium's "protection". Such protection is of course very expensive and the planet's government must supply resources on an annual basis, both material and human, to support their benefactor. The constant state of war and conquests by the Imperium has put a severe burden on such small planets, and Vordiana II, stricken by a string of planetary water drought, has become a world devastated by famine and poverty. After years of such conditions, the recent "enrollment" of a large proportion of the male youth population of the planet has been the catalyst and the cause of a female-led, popular resistance movement amongst the lower and middle class of the planet. Led by Antin Sanu, a crafty ex-military commissar of the Imperium, the insurrection has been a thorn in the side of the pro-Imperium government of Vordiana II for more than a year now; raids, sabotage, and the assassination of Imperium embassy personnel have been the bread and butter of the operation. 

Mostly equipped with older weapons and equipments and whatever they can salvage, the Insurrectio has used the "maquis" example of organization, dividing itself into self-contained and independent rural guerrilla bands and can be best described as a paramilitary organization, although the government has labelled them a terrorist organization, "rebels" to be exterminated at all costs.

---------------------------------------------------------------------------------------------------------------------

The "Insurrectio" is my second Sci-Fi outfit, after the Effigy Corporation. It is meant as a small "spaceband", to play in various Sci-Fi skirmishes. I find the figures, just like the Effigy Corporation, would fit equally well in some Pulp, Cyberpunk or distant future Sci-Fi settings. They could also be used in a pinch as Imperial Guards in a Rogue Trader game. And of course, could be used as the small principled band of resistance fighters against the highly trained Havoc Teams of the Effigy Corporation! My intro above is one of many uses for these lovely figures!

Same as the other outfit, the project is largely an excuse for me to paint some lovely Sci-Fi figures I've been eying for a while and which don't neatly fit in any actual game system. They also make for easy "transportable forces" for games away from home.

This merry band of female fighters is from the "Resistance Fighters" range from Statuesque Miniatures and it is a lovely little range. The sculpts are truly fantastic and full of personality, and were a joy to paint. My only criticism would be that some delicate assembly is involved, and gluing small hands or arms is always annoying, even more so on delicate female sculpts. I believe this is my first ever all women outfit! It is made-up of 13 members, including a (sexy) Cyborg!

The "Vordania II Insurrectio" 

I tried to give the outfit a unified theme of green and purple while still giving each figure some personality.  I'm happy with the end result.

The bad ass girls of the Insurrectio

First up we have the Command group: Antin Sanu in her commissar uniform and her cadre of officers. The two middle figures are probably my favourites of the range, they have *loads* of attitude!


Next up the heavy weapons and communication specialist. I love the extra-sized Thompson-style heavy machine gun!


and then we have the regular Insurrectio fighters, with the Cyborg in the middle. Actually, the Cyborg was part of Statuesque's Pulp range, and is meant to be a Fembot of sort, but the addition of the cyborg head makes all the difference and I find the figure fits very well with the rest of the girls. I also wanted each of my Sci-Fi outfit to have a robot of some sort, and she fits the bill.


There's a few figures from the range I still haven't painted, as they were OOP when I made my purchase, so I might add a few extra girls to the band one day. Or not, as it is the right size for what I'm aiming for. 

I haven't decided (or bought) my next Sci-Fi oufit, but I'm thinking something "Imperial" in nature...

These gals are my second entry in the Analogue Hobbies Painting Challenge and will net me a total of 65 pts (13 28mm figures). Now, let's move to smaller things, like Halflings and Epic stuff...